Percipio Learning - Schedule Reports
If you need to regularly run a report, you can schedule it to run automatically and have the system notify you when it's ready. Setting a schedule allows you to focus on other things until you get notified.
When you set up a schedule, you can also choose to share the scheduled report with users in your company who have a Percipio user account. These users also get notified when the report is ready. These users can have any Percipio role. If a shared user only has a role of learner, they can only download the report itself, they do not see any other admin feature or function.
Because downloaded reports are only available for 14 days, you can only share a report during that 14-day duration. On the fifteenth day, the report is removed from the download list and shared users lose access to it.
Schedule a report
To schedule a report and share it with others:
- From Analytics, select View all reports.
- Select the report you want to schedule and customize the report data you want to see.
- Depending on the report you selected:
- If you selected a Standard report, select Create report schedule. The schedule always uses whatever filters you defined at the time you created the schedule.
- If you select a Report template, from Actions, select Create report schedule. If you don't save the template first, the schedule uses your default settings to generate the scheduled report. If you save the template first, the schedule always uses the last saved template to generate the scheduled report.
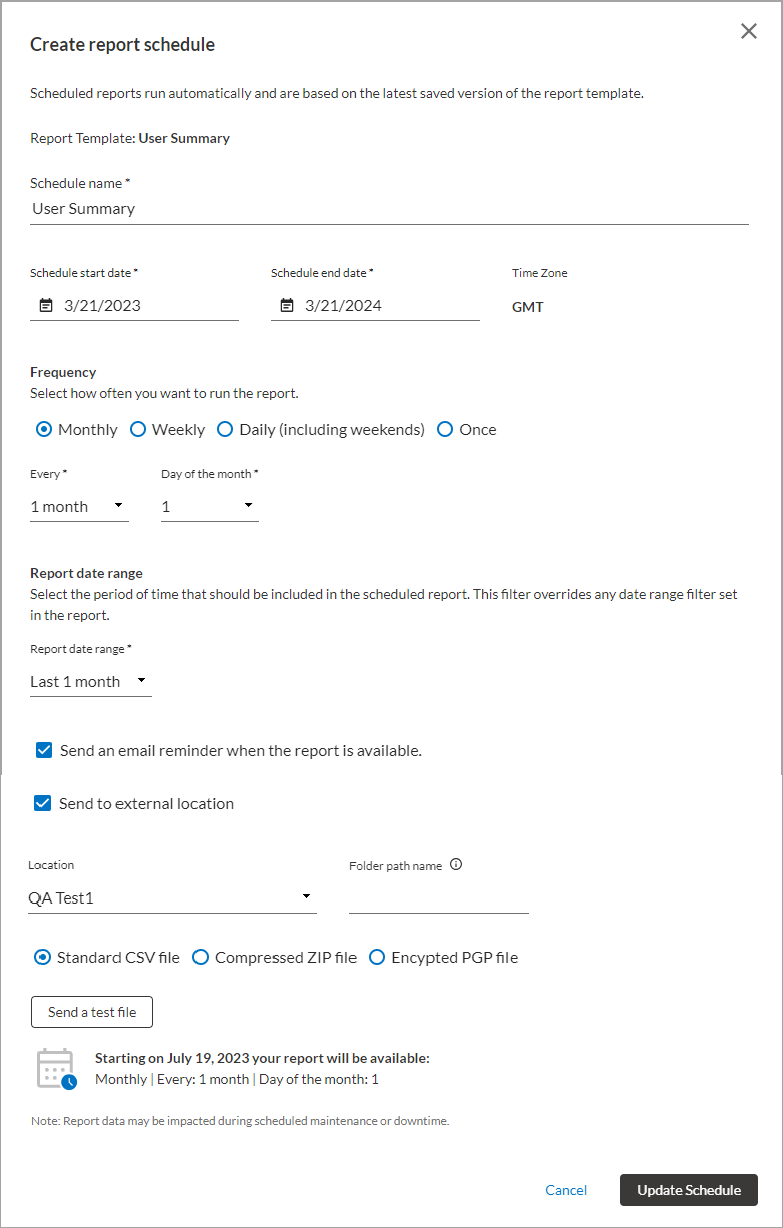
- Enter the schedule information, including:
- Schedule name: The name of the schedule so you can find it in the Scheduled reports list.
- Schedule start and end dates: Specify the date that the schedule should start and end. Both are required.
- Frequency: Select how often the report should run.
- Report date range: Select the period of time for the data included in the report. This filter overrides any date range filter you set when definign this report.
- Email reminder: Select this option if you want to get an email reminder when your report is ready.
- Select Create schedule. You get a confirmation that your report is scheduled.
- You have three options, select one:
- Done: Returns you to the report.
- Edit report schedule: Returns you to the Schedule page so you can make modifications to the report schedule.
- Share scheduled report: Takes you to the Share schedule report page so you can specify names or audiences with whom to share the report.
- Enter up to 10 users or 10 audiences.
- Check whether users should get an email notification when the scheduled report is ready.
- Change the Sender name if applicable. This shows in the From line in the recipient's email.
- Enter up to a 250 character message letting the recipients know what is in the report and why they are getting it.
- To share the report, select Share scheduled report. Otherwise, you can Cancel to return to the report.
Remove a report schedule
When you remove a report schedule, the schedule and any sharing associated with the report is removed. Reports already run stay active in the Downloads tab for the full 14 days.
To remove a schedule:
- From Analytics, select View all reports.
- Select the Scheduled reports tab.
- Locate the report schedule that you want to remove, and from the Actions column, select Remove report schedule.
- Select Yes, remove schedule. If you change your mind you can select No, keep schedule.
Edit a report schedule
When you edit a report schedule, any new reports generated after editing assume the new schedule parameters. Reports already run stay active in the Downloads tab for the full 14 days.
To edit a schedule:
- From Analytics, select View all reports.
- Select the Scheduled reports tab.
- Locate the report schedule you want to edit, and from the Actions column, select Edit report schedule.
- Make any changes to the report schedule.
- Select Update schedule. If you change your mind you can select Cancel.
Change sharing on scheduled report
You can add or remove users or audiences from a scheduled report that you shared. The users and audiences you add get the next report run. Users or audiences you remove, still see existing reports already run for the full 14 days, but do not get any new reports.
To change sharing on a scheduled report:
- From Analytics, select View all reports.
- Select the Scheduled reports tab.
- Locate the report schedule for which you want to change sharing, and from the Actions column, select Manage schedule sharing.
- Make any changes to the sharing.
- Select Share scheduled reports. If you change your mind you can select Cancel.
Related Articles
Percipio Learning - Create a New Assignment
You can create assignments for entire audiences and/or individual learners. Audiences are comprised of learners who have a defined set of user attributes. When you assign user attribute values to learners, they are automatically added to one or more ...pcl.LMS Learning - How to schedule reports to be emailed to specific recipients
pcl.LMS allows you to schedule your reports and email them to your preferred recipients automatically. To set up your first scheduled report: 1. Sign in to your pcl.LMS account as Administrator and go to Home > Reports. 2. On the right-hand panel, ...Percipio Learning - Share Reports
After you run and download a report, you can share it with users in your company who have a Percipio user account. These users can have any Percipio role. If a shared user only has a role of learner, they can only download the report itself, they do ...PeopleFluent Learning - How to schedule a report
Video: How to Schedule a Report Click here to watch the video full screen. You can schedule a report by navigating to Manage Center > Reports to generate a report. You can either generate a report using the Report Wizard to create your own custom ...pcl.LMS Learning - How to work with custom reports
pcl.LMS lets you create your own custom reports to narrow report results to specific groups of users and focus your reporting on important stats and attributes. Note: Custom Reports are available with all the Plus and Premium plans. To create your ...